Defining OpenCMS structured XML content
Learning the OpenCMS
Background and purpose of document
The purpose of this paper is to document a procedure for defining structured XML content in OpenCMS so that it becomes available through the Workplace for content management.
OpenCMS offers automatic form generation for management of structured content through the Workplace.
However, in order for this facility to function it is necessary to take appropriate steps both for defining the structured content and for configuring the Workplace to use the provided definition.
Due to the lack of documentation and the fact that the procedure is not obvious and requires some steps that cannot be performed using the standard OpenCMS administrative interface (the Workplace), making it work is a frustrating experience for a newcomer to OpenCMS.
At the time this document is written, there are only 3 sources of information related to this subject (at least these are the ones I have found referred on the [opencms-dev] mailing list):
- The tutorial provided by Alkacon Software as part of the OpenCMS documentation. Named “OpenCMS XML content documentation”, it provides detailed information about structured content definition using XML Schema Definition (XSD), but it gives no detail about how to get the definition to be used in the Workplace interface. In a new OpenCMS instance (with documentation modules installed) the tutorial can be found at <server_domain>/opencms/opencms/alkacon-documentation/documentation-xmlcontent/.
- A message on [opencms-dev] mailing list, sent by Alexander Kandzior from Alkacon Software on 30th of October 2004 with subject “XML Content Demo”. It provides a procedure to build the definition and use it in the interface, but many list members complaint that it is not working as expected. Also, the method used to get info in the Workplace is considered deprecated in this moment and is too complicated compared with alternatives. The example was given while OpenCMS 6.0 was still in beta (the version used while writing this is 6.2.2). The message can be found in [opencms-dev] mailing list archives at [http://web.archive.org/web/20060211142336/http://mail.opencms.org/pipermail/opencms-dev/2004q4/013609.html http://mail.opencms.org/pipermail/opencms-dev/2004q4/013609.html}.
- A video tutorial provided by Watchdog Systems (www.wdogsystems.com) using a different (and more “modern”) approach at http://www.wdogsystems.com/opencms/opencms/demos/index.jsp. The procedure described in this paper is based on the one presented in this tutorial (which, for unclear reasons, did not work for me straightforward, but only after adapting it in the form included below).
The main problem with all these presentations is the lack of explanation regarding the concepts and entities involved so that the user to get a clear view of the reasons behind the proposed actions. The purpose of this how to is to cover these aspects as well as provide the list of actions needed.
Software versions
The machine used for testing and generating the screens runs:
- Windows XP Professional SP2;
- Java 1.5.0_07;
- Tomcat 5.5.17;
- OpenCMS 6.2.2 (with documentation and Template One modules installed).
What is to be done
Objective
- To define a custom structured content type and
- to make it available for content management through the Workplace (OpenCMS administrative) interface, namely:
- the name of the type to show up in the list of new document types (displayed when the “New” button is pressed in Explorer view);
- the associated form to appear when either a new document is created based on that content type or when an existing document of that specific type is edited.
What we need to accomplish
The list of the elements that need to be created is reversed in the presentation below in order to accommodate the required explanations. The step by step procedure that follows will describe the actions needed to create these elements in the correct order.
- The first objective, defining custom content type, is reached by writing the appropriate XSD file. The content of such a file is very well explained in the “OpenCMS XML content documentation” provided in the standard documentation (<server_domain>/opencms/opencms/alkacon-documentation/documentation-xmlcontent/).
- Making the new content type available in the OpenCMS administrative interface (the Workplace) requires manual updating of some configuration files of the OpenCMS because there is no way of doing it differently. The changes are described below.
Where
The configuration information for OpenCMS (and the Workplace) can be found in some XML files located in WEB-INF/config folder under the OpenCMS application folder in Tomcat (usually the path is <Tomcat installation folder>/webapps/opencms/WEB-INF/config/).
Workplace configuration is taken from two files, namely opencms-vfs.xml and opencms-workplace.xml. While editing these files would (as it is said) have the expected effect, this is not the place to make such changes. Instead, it is recommended to build a OpenCMS module for holding the required files together and to edit its definition in the opencms-modules.xml file (in the same location). This file will contain similar information as the two named ones and from here the definitions will be automatically used by OpenCMS in the proper way.
The above operation (updating opencms-modules.xml) must be made, of course, only after creating the OpenCMS module we have been talking about.
What
The information that needs to be added to the opencms-modules.xml about the new structured content is:
- A reference to the content schema definition (the XSD file which holds it). This is done through a element under
<type>in the module definition.<resourcetypes> - Details about the content type in the Explorer view of the Workspace (name, description, icon, permissions etc.). This is done using a element under
<explorertype>section of the module definition.<explorertypes>
The rest of the required configurations can be done through the Workplace interface. These configurations are the definition of the module, creation of the resource bundle for listing the labels (and potential localized versions of them) for form generation and updating the module resources list.
Haia
Step by step procedure
The procedure is composed of three major steps;
- Create the module and configure it (using the Workplace interface);
- Create the structured content definition file, the XSD (also using the Workplace interface);
- Edit module definition in opencms-modules.xml and add resource and explorer type definition, then create workplace.properties file for storing interface labels.
If everything is successful, then the new content type should appear in the new documents list and can be used as any other predefined type.
Step 1 – Create the module and configure it
A. Creating the module
Create the module using the Module Administration tool in the Administration view of the Workplace. Make sure you are using the Offline project, otherwise the system will not allow the action.
Except for the module name, it is important to check the options for creating the module and classes subfolders. This action will save us the effort to configure them manually in opencms-modules.xml.
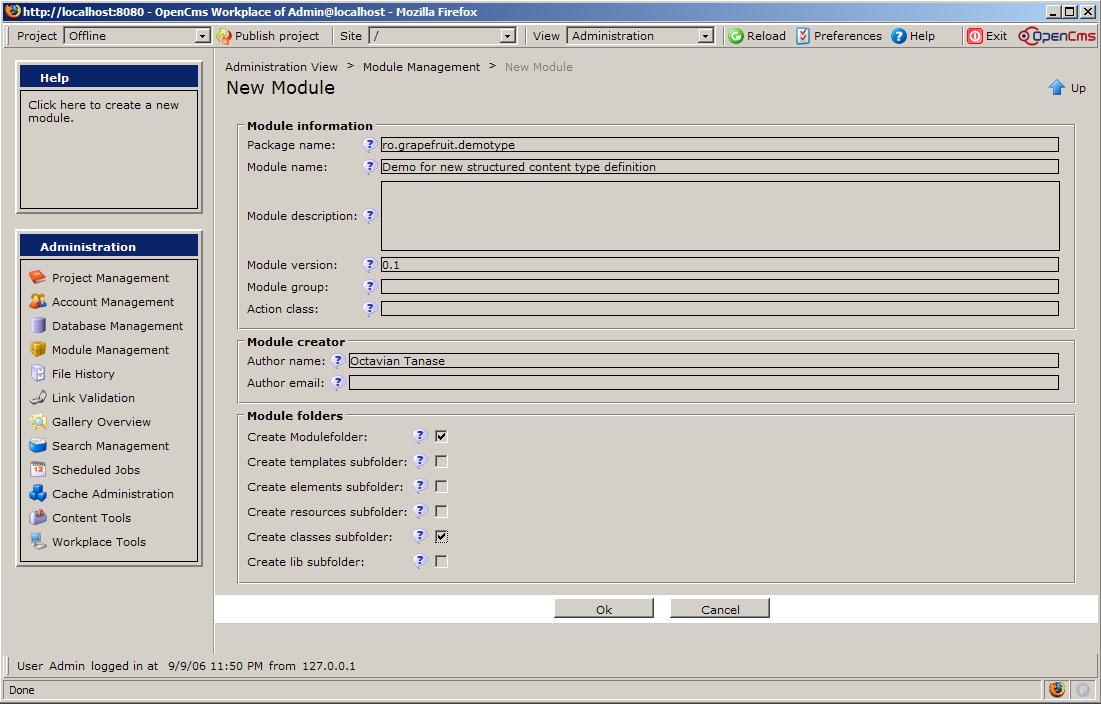
Figure 1 - New module creation using Administration tool
The module should show up in the modules list in Administration.
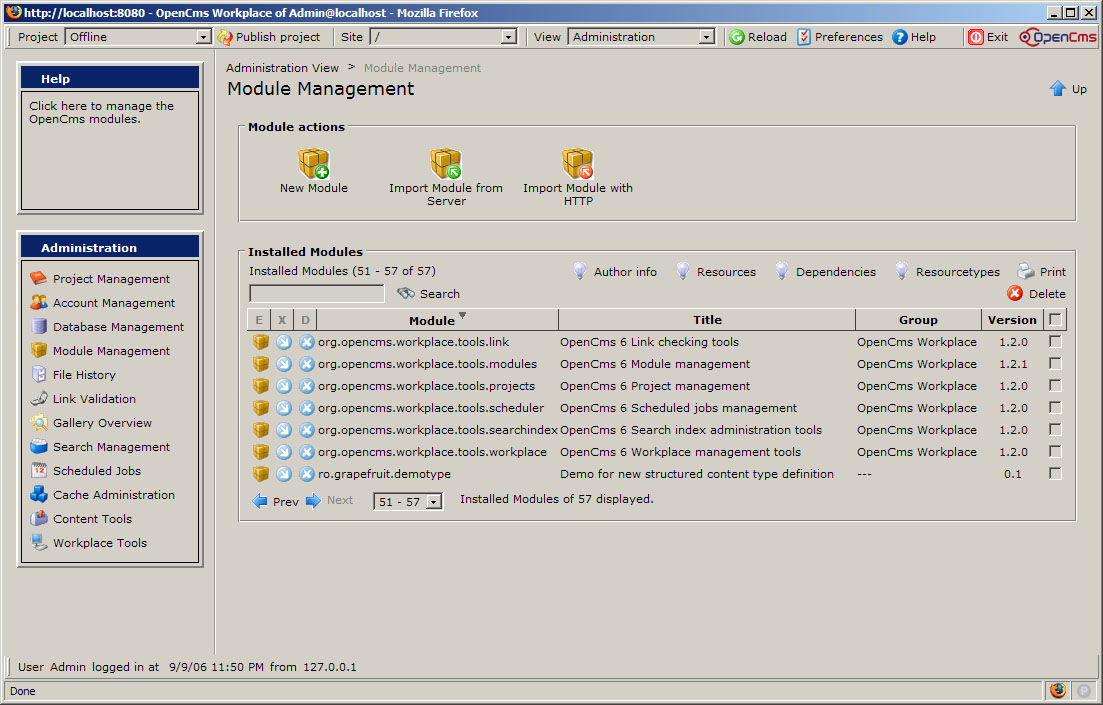
Figure 2 - Modules list in Administration view
Because the “classes” subfolder was created using the module creation wizard option, an export point for it was also automatically created. It is mandatory to check that this exportpoint exists. This can be seen using the module administrative tools.
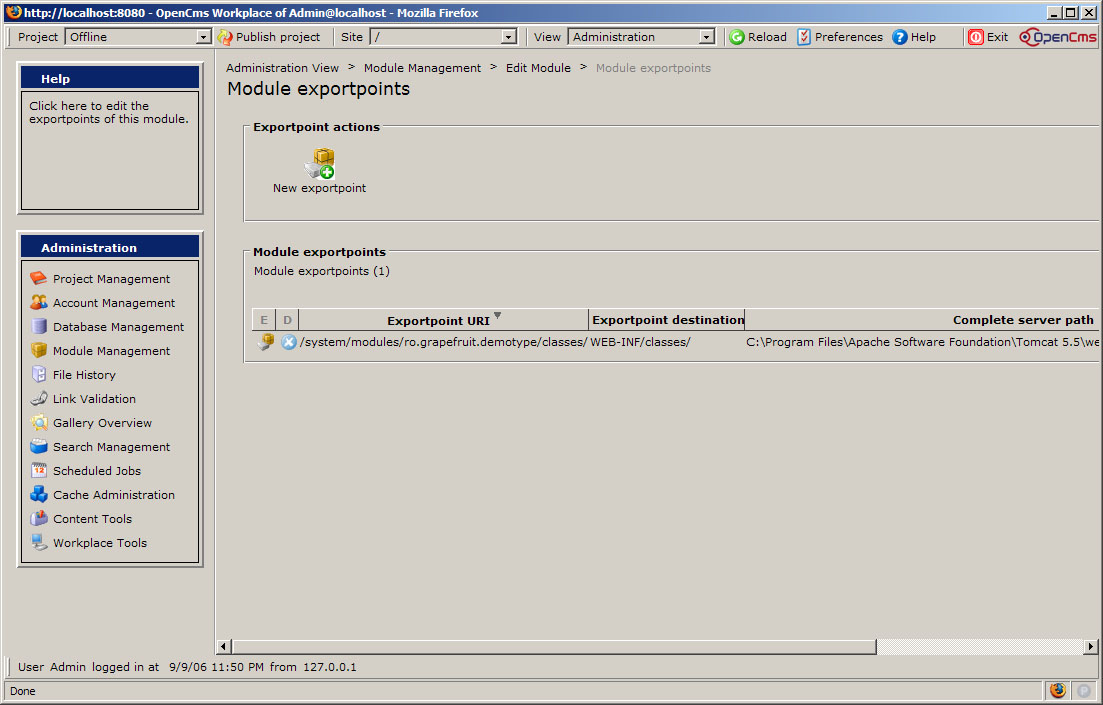
Figure 3 - Exportpoints list for the new defined module
Note: If, when defining the module, you did not use the facility for creating the required folders, then the module and classes folders will have to be created in VFS and the export point for “classes” folder will have to be manually added in the interface.
The module folder will have to be placed in VFS in “/system/modules/” and named using the chosen module name (according to Java convention for name uniqueness, e.g. “ro.grapefruit.demotype”).
The “classes” subfolder will be placed under the module folder and will contain a subfolder structure derived from module name according to Java conventions (nested subfolders for every token in the name found between two dots, e.g. “classes/ro/grapefruit/demotype”).
Following our example, we will have the final structure: /system/modules/ro.grapefruit.demotype/classes/ro/grapefruit/demotype/ as in the picture below.
The export point will have to map the “classes” folder to “WEB-INF/classes” and can be added using the module management interface as in the picture above.
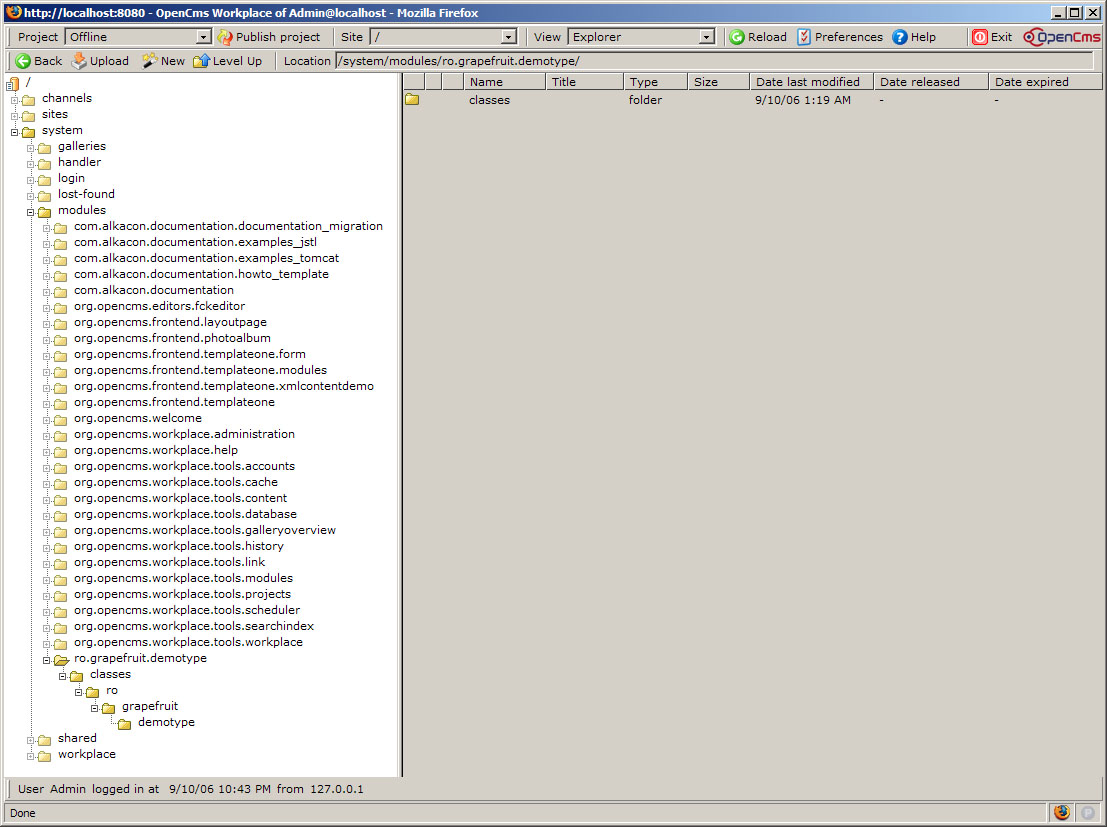
Figure 4 - Resulted file structure for module management in VFS
B. Adding resources
The resources list for the module should include paths to files used in structured content configuration and located in different places in VFS. In particular, the path to the folder containing icons for listing the structured content in the Workplace interface. The default folder of this type is “/system/workplace/resources/filetypes/” which should be added.
If there are any other resources, they can be added as well using the administrative tool in Module Management interface.
Below is the minimum list of resources (the module folder and the filetypes folder).
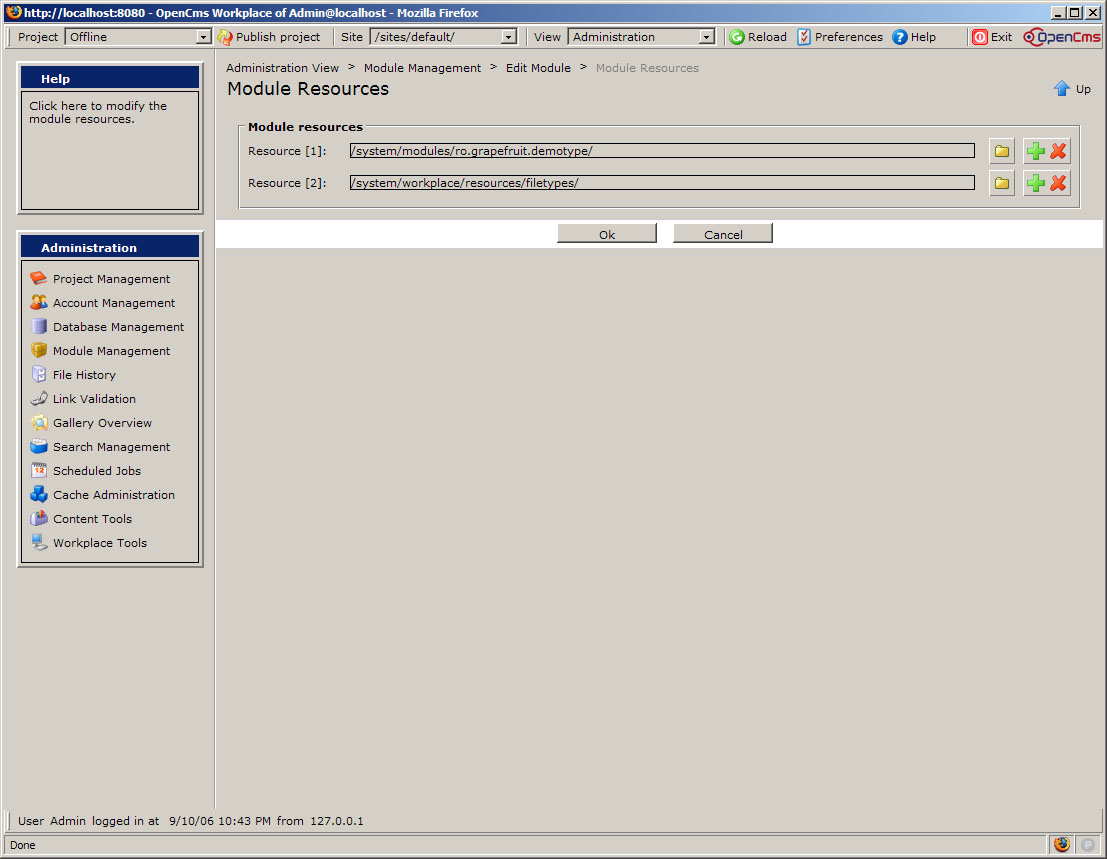
Figure 5 - Module resource list
Step 2 – Create the schema definition file for new structured content type
A. Create a dedicated folder in the module
As we intend to standardize content, it is better to keep the definitions within the module than in the site content area. In order to keep things organized, it is recommended (by convention) to save XSD files in a folder named “schemas” and located in the module folder (parallel to the “classes” folder).
We will create then, using the Explorer interface, the folder
/system/modules/<module name>/schemas/
or, according to our example,
/system/modules/ro.grapefruit.demotype/schemas/
The final result should look like the one below:
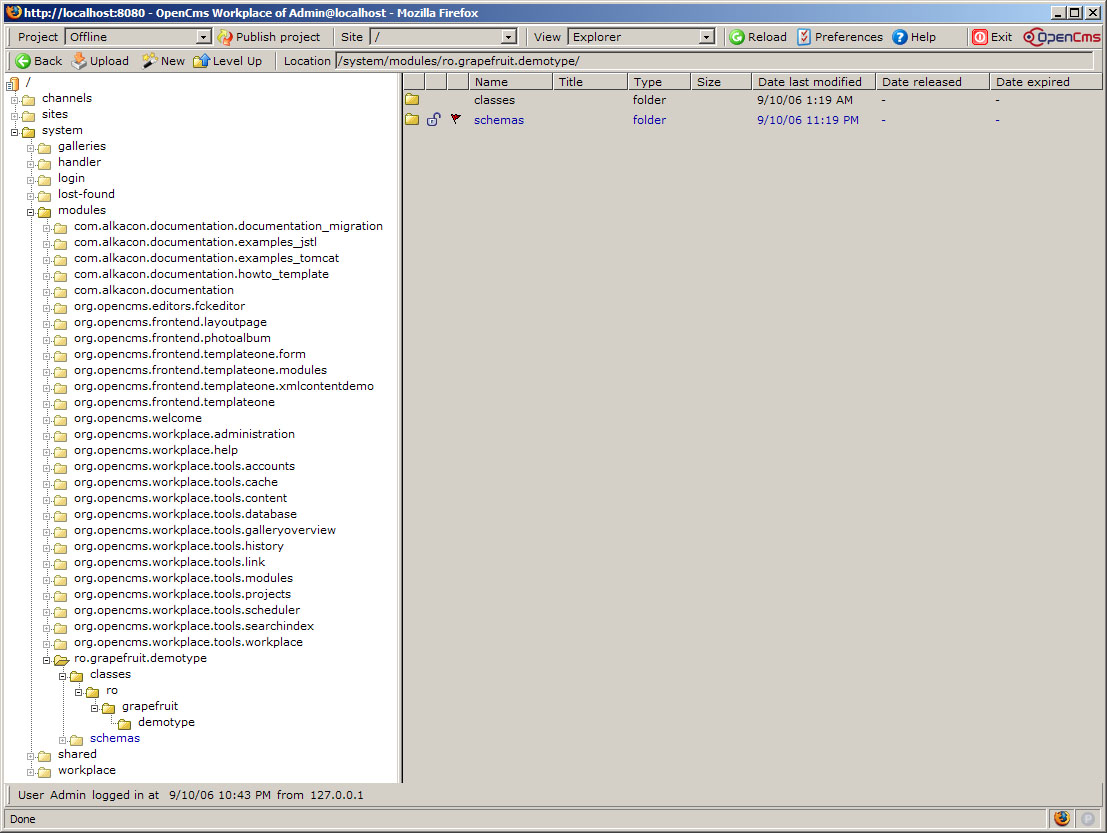
Figure 6 - Adding the "schemas" folder in the module
B. Create a schema definition for new structured content type
In the “schemas” folder create a new “.xsd” file (text) to hold the structured content type definition. The rules for writing such files are very well described in the documentation delivered with OpenCMS, namely in the “OpenCms XML content documentation” tutorial found at <server_domain>/opencms/opencms/alkacon-documentation/documentation-xmlcontent/.
In our example we have named the file “demotype.xsd” and a content similar to “simpleexample.xsd” provided with the Alkacon documentation referred above.
The schema, presented in the image below, defines a structured content type named “DemoType” which is similar to a news item.
Note: Make sure you comply to the very strict rules referring to namespace, inclusion of theschemaLocation
If you require a more advanced xml stucture, like sub-complex types, for your structure content, check out the Advanced Structure XML Content page.
The result should look like the one below:
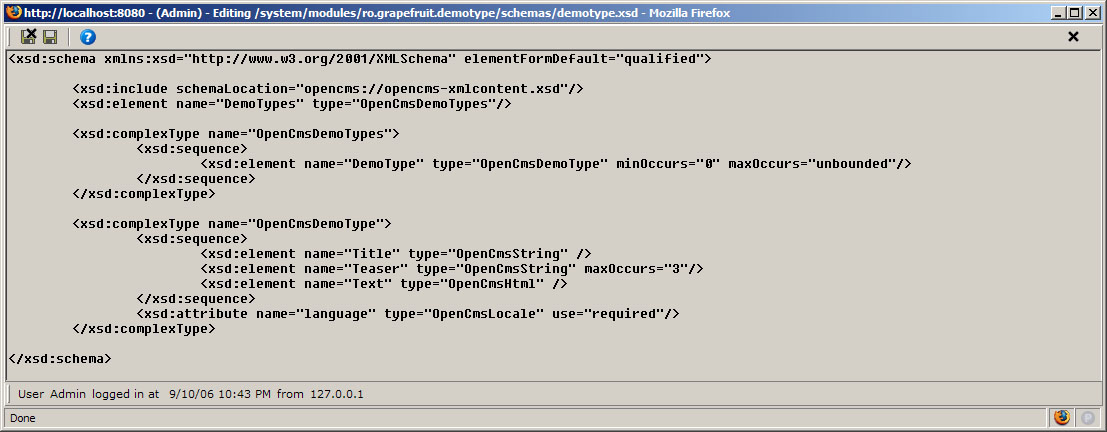
Figure 7 - XML schema definition for a new structured content type
A typical case you may encounter is using a OpenCmsHtml type content. OpenCms uses fckEditor for editing them, although a special widget must be set and properly configured. Configuration of these contents is easy, but not easy to know.
You can configure widgets through the <xsd:appinfo> tag in the schema definition, using the <layouts> node:
<xsd:appinfo>
	<resourcebundle name="org.mymodule.www.workplace"/>
	<layouts>
		<layout element="Description" widget="org.opencms.widgets.CmsHtmlWidget"
			configuration="htmlgallery,css:/system/modules/org.mymodule.www/resources/styles_editor.css">
		</layout>
	</layouts>
</xsd:appinfo>
The Core User Interface Widgets for the 7th version of OpenCMS are: CalendarWidget, CategoryWidget, CheckboxWidget, ColorpickerWidget, ComboWidget, DisplayWidget, DownloadGalleryWidget, GroupWidget, HtmlGalleryWidget, HtmlWidget, HttpUploadWidget, ImageGalleryWidget, InputWidget, InputWidgetPlaintext, LinkGalleryWidget, LocalizationWidget, MultiSelectWidget, SelectWidget, TableGalleryWidget, TextareaWidget, TextareaWidgetPlaintext, UserWidget, VfsFileWidget.
Also included are OrgUnitWidget, PasswordWidget, PrincipalWidget and RadioSelectWidget, but they are not enabled by default. To enable them, edit the file "WEB-INF/config/opencms-vfs.xml" and insert the following code at the <widgets> section:
	<widget class="org.opencms.widgets.CmsRadioSelectorWidget" alias="RadioSelectWidget"/>
	<widget class="org.opencms.widgets.CmsPasswordWidget" alias="PasswordWidget"/>
	<widget class="org.opencms.widgets.CmsPrincipalWidget" alias="PrincipalWidget"/>
	<widget class="org.opencms.widgets.CmsOrgUnitWidget" alias="OrgUnitWidget"/>
Step 3 – Update opencms-modules.xml and defining interface labels
A. Find the spot for making changes
Locate the opencms-modules.xml configuration file in the operating system file system and edit it using your favourite XML editor.
The opencms-modules.xml file is located at
<Tomcat installation folder>/webapps/opencms/WEB-INF/config/
name
Here is the place where you will have to add some new elements describing the content type and instructing the interface how to use it.
The image below highlights the definition for ro.grapefruit.demotype module where the changes will be made.
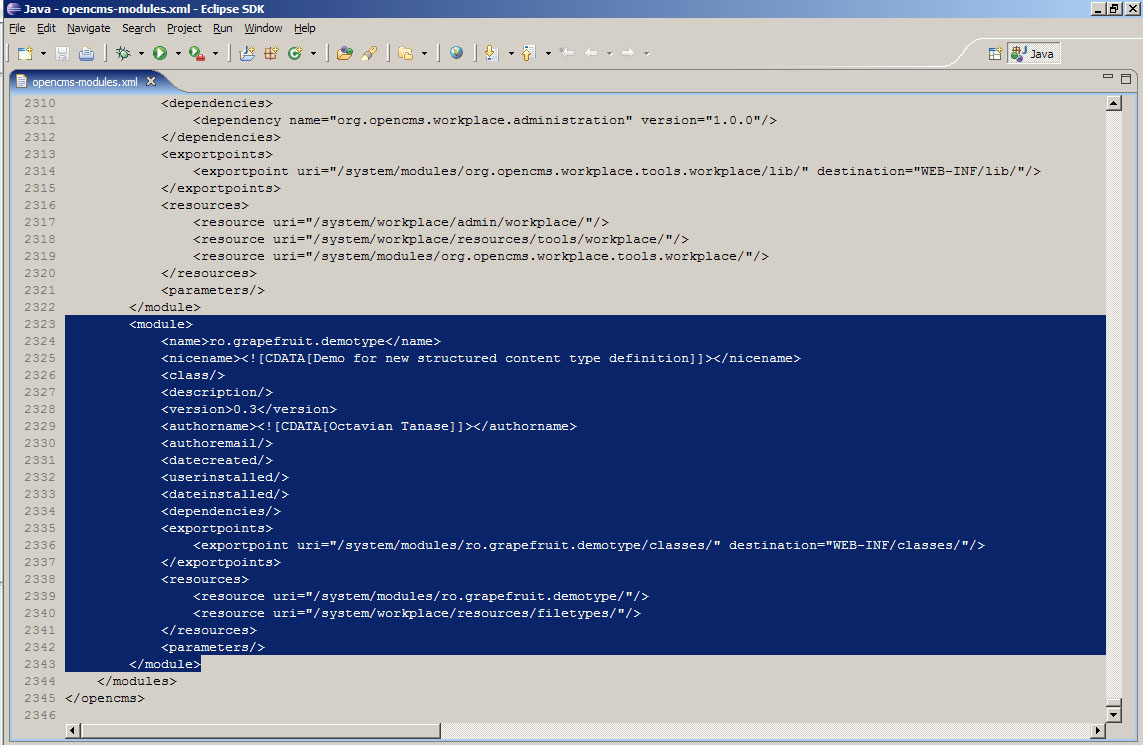
Figure 8 - New module definition in opencms-modules.xml
B. Add resource and Explorer type definitions
The easiest and safest way to add this new element is to copy it from an existing module and modify it to suit your needs.
An example dedicated to this purpose is the TemplateOne module supplied with the system. Search for “org.opencms.frontend.templateone.xmlcontentdemo” module and check the<resourcetypes>and
<explorertypes>elements (highlighted in the image below).
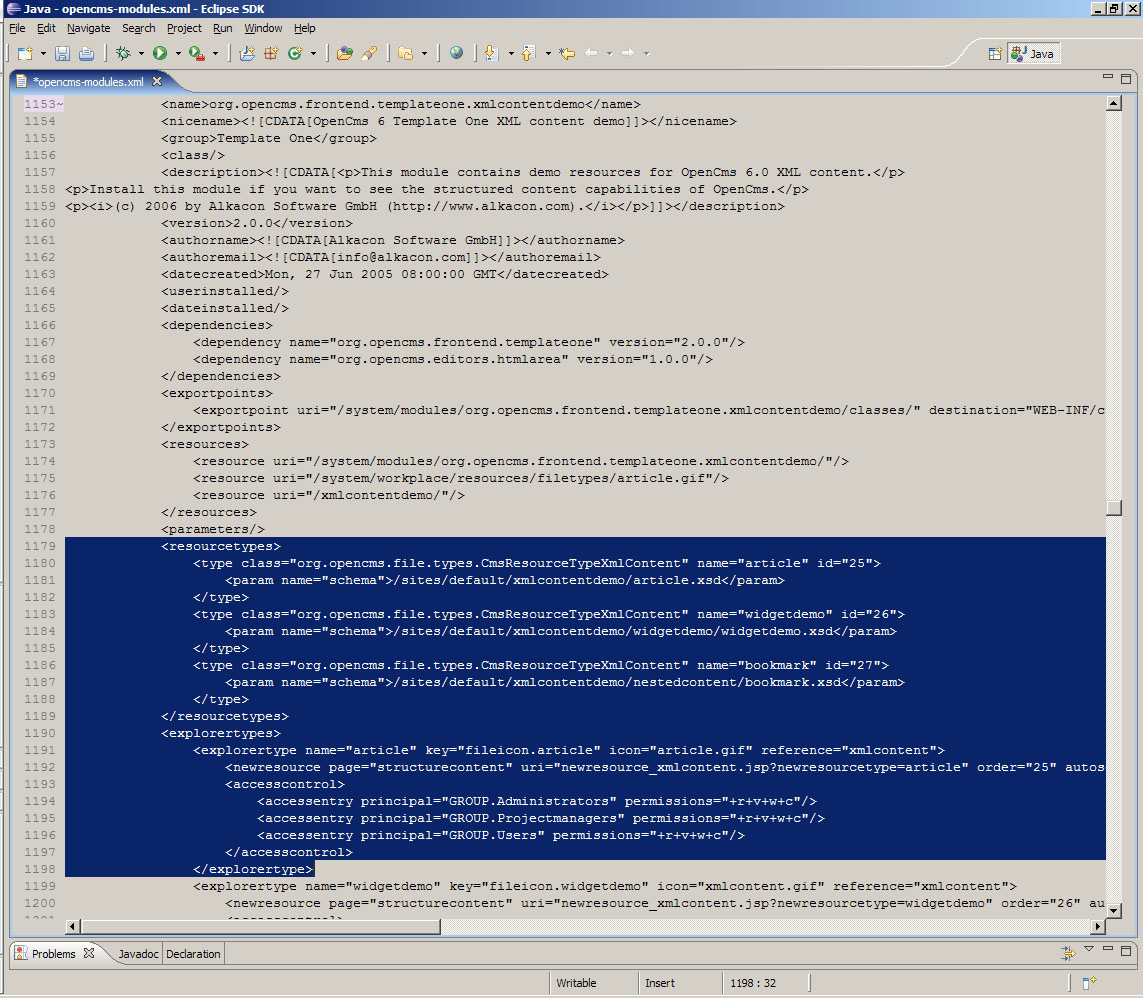
Figure 9 - TemplateOne module with resource types and explorer types definitions in opencms-modules.xml configuration file
Copy one type definition for each of them and insert them in your module definition, then update the required informations.
Forresourcetypedefinition, change the name attribute to the name of the type you are defining, change the id attribute to one unique across the entire OpenCMS system (starting from 100 should give you a safe choice, but check it out in
opencms-modules.xml,
opencms-vfs.xml, and
opencms-workplace.xml) and update the path to the XSD file where you described the content structure in the param element named “
schema”. For the
explorertype, change the name attribute to reflect your content type, give the key attribute a corresponding value, select which icon file should be used (from the ones in the “filetypes” folder we added as a resource). Also, in the
newresourceelement under
explorertype, change the name of the type in the
uriattribute and change the
orderattribute to the id selected for the resource type. The
accesscontrolelement establishes who has access to the new type of content (default, as in our example, is everybody, i.e. all predefined groups.
The final result should look like this:
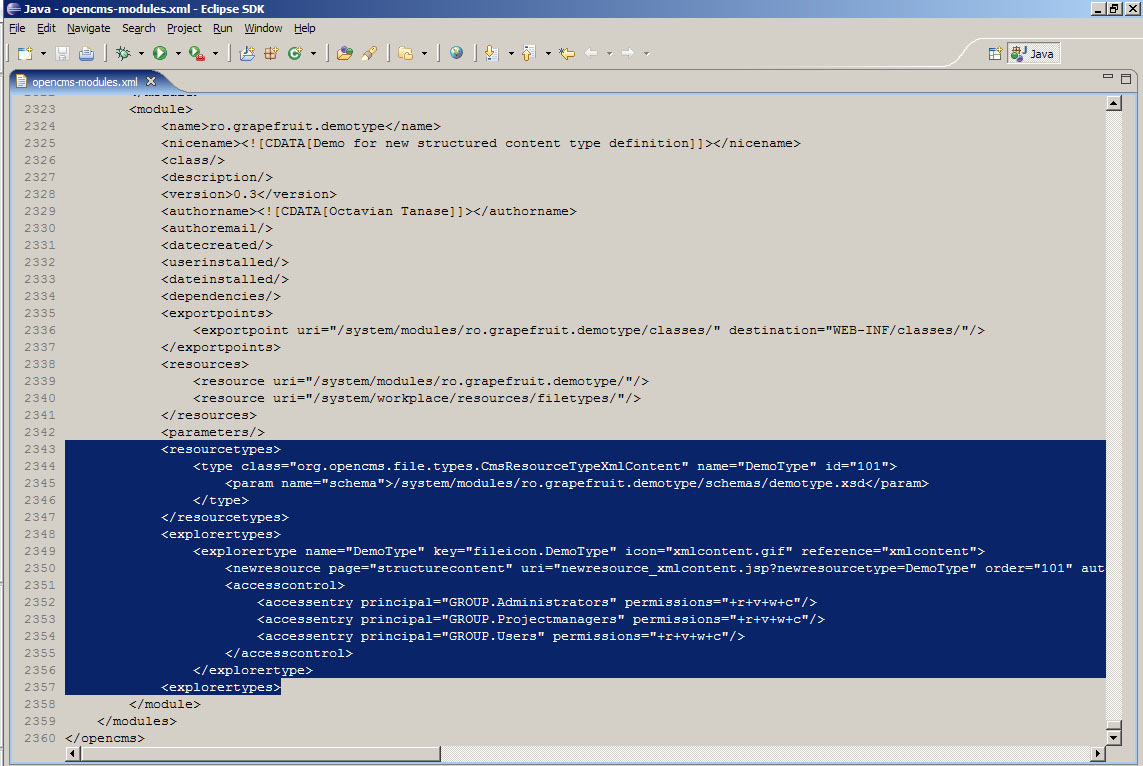
Figure 10 - resourcetype and explorertype definitions in opencms-modules.xml
Associating a JSP template with the structured content
You may associate a JSP template with the newly created structured content by adding it to the properties section of the type element above the param tag.
Following our example, our JSP template is located in the folder: /system/modules/ro.grapefruit.demotype/templates/demotemplate.jsp
and will be associated with the structured content by adding the properties section:
<resourcetypes>
	<type ...>
		<properties>
			<property>
				<name>template-elements</name>
				<value type="shared"><![CDATA[/system/modules/ro.grapefruit.demotype/templates/demotemplate.jsp]]></value>
			</property>
		</properties>
		<param name="schema">...</param>
	</type>
</resourcetypes>
As soon as you create a new document with the above defined structured content type, the associated JSP template will be used to render the content. Editors can also change the associated template by modifying the property template-elements using the properties editor within the workplace.
For OpenCMS 7.0.4, you cannot associate JSP template by editing system-modules.xml. Instead, you can only edit 'template-elements' property of either the new XML file you create or the parent folder of the new XML file. In this example, you set 'template-elements' to /system/modules/ro.grapefruit.demotype/templates/demotemplate.jsp. Please note it is 'template-elements' property, not 'template'.
PS, I don't know why and I am not sure if I am correct, the JSP template (/system/modules/ro.grapefruit.demotype/templates/demotemplate.jsp) can not be derived from the other JSP template.
C. Define interface labels in workplace.properties file
The last thing to do is to define how will this content type be named when listed in the Workplace interface and, if needed, how will the fields be named in the form automatigally generated for management of this content.
All this information is held in a resource file (hash table) named “workplace.properties” (of type text) which should be placed in the “classes” folder, under the latest subfolder of the structure defined in Step 1.
In our case, this file will be located in
/system/modules/ro.grapefruit.demotype/classes/ro/grapefruit/demotype/
and will list the following:
fileicon.DemoType = DemoType
title.DemoType = Create new DemoType
Similar to the other situations described above, the content of this file can be developed based on examples. If using the TemplateOne example provided by Alkacon Software, you can copy and edit the similar file found at
/system/modules/org.opencms.frontend.templateone.xmlcontentdemo/classes/org/opencms/frontend/templateone/xmlcontentdemo/workplace.properties.
Note: if localized versions of the interface should be provided, then this is the place to do it through parallel versions of workplace.properties having the locale appended to the file name and identical keys translated in different languages (e.g. workplace_ro.properties, workplace_de.properties etc.).
The final result should look like this:

Figure 11 - workspace.properties file
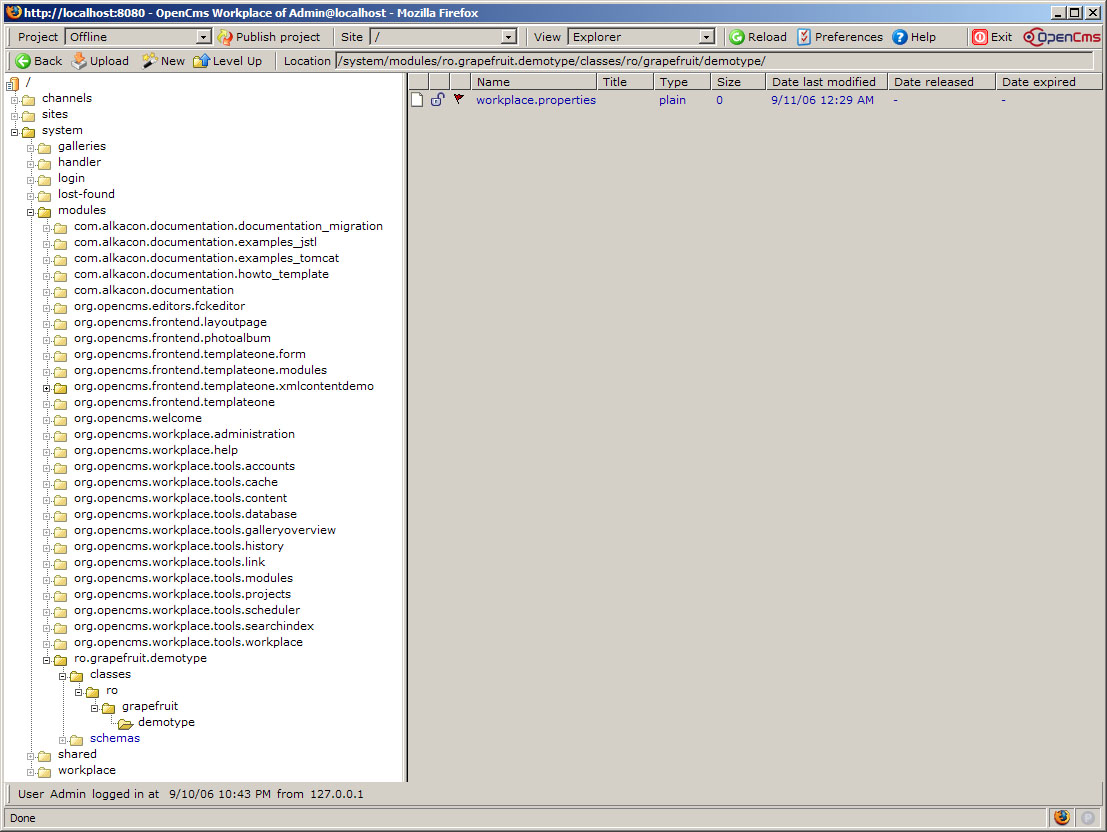
Figure 12 - workspace.properties file location in VFS
Also, for the labels at the Workplace Interface, the "workplace.properties" property must match the format "label.[MAIN_ELEMENT].[ELEMENT]=A Label Text", where both MAIN_ELEMENT and ELEMENT come from the XSD Schema you created.
Both come from the attribute "name" from the tag <xsd:element>, but MAIN_ELEMENT is from the main ComplexType (the one with the mandatory <xsd:complexType name="OpenCms[MAIN_ELEMENT]s">), and ELEMENT from the second ComplexType (the one with fields definitions).
And, the same thing for the help/hint "label.[MAIN_ELEMENT].[ELEMENT].help=Some hint description".
So, finally, for the following XSD Schema...
<xsd:schema xmlns:xsd="http://www.w3.org/2001/XMLSchema" elementFormDefault="qualified">
	<xsd:include schemaLocation="opencms://opencms-xmlcontent.xsd"/>

	<xsd:element name="Example" type="OpenCmsExamples"/>

	<xsd:complexType name="OpenCmsExamples">
		<xsd:sequence>
			<xsd:element name="Example" type="OpenCmsExample" minOccurs="0" maxOccurs="unbounded"/>
		</xsd:sequence>
	</xsd:complexType>

	<xsd:complexType name="OpenCmsExample">
		<xsd:sequence>

			<xsd:element name="ExampleField" type="OpenCmsString" minOccurs="0" maxOccurs="1" />

		</xsd:sequence>
		<xsd:attribute name="language" type="OpenCmsLocale" use="optional"/>
	</xsd:complexType>

	<xsd:annotation>
		<xsd:appinfo>
			<resourcebundle name="org.example.workplace" />
			<preview uri="${previewtempfile}" />
			<mappings/>
			<layouts />
			<validationrules/>
			<defaults/>
			<relations/>
		</xsd:appinfo>
	</xsd:annotation>

</xsd:schema>
...the file "/system/modules/[module]/classes/org/example/workplace.properties" would look like this:
fileicon.example = Example Schema
desc.example = Description for examples

label.Example.ExampleField = Ex.
label.Example.ExampleField.help = A hint at the Worplace Interface
D. Restart Tomcat
Restart Tomcat and check the logs to make sure OpenCMS application was restarted correctly. If it did not come up, check the opencms-modules.xml file for errors in the lines added and try again.
The logs are available in:
<Tomcat installation folder>/logs/
<Tomcat installation folder>/webapps/opencms/WEB-INF/logs/opencms.log
Using the defined structured content
In the Explorer view of the Workplace interface create a new file of type DemoType include the new type as in the image below:
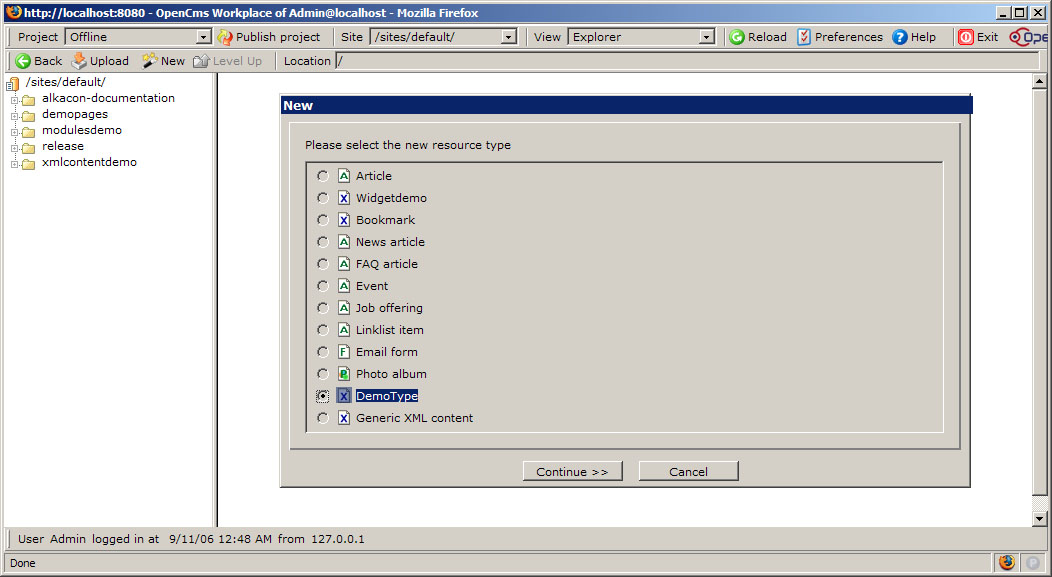
Figure 13 - Creating new structured content
The file will be listed in Explorer view and by using the Edit command we get to the automatically generated form.

Figure 14 - File based on new structured content
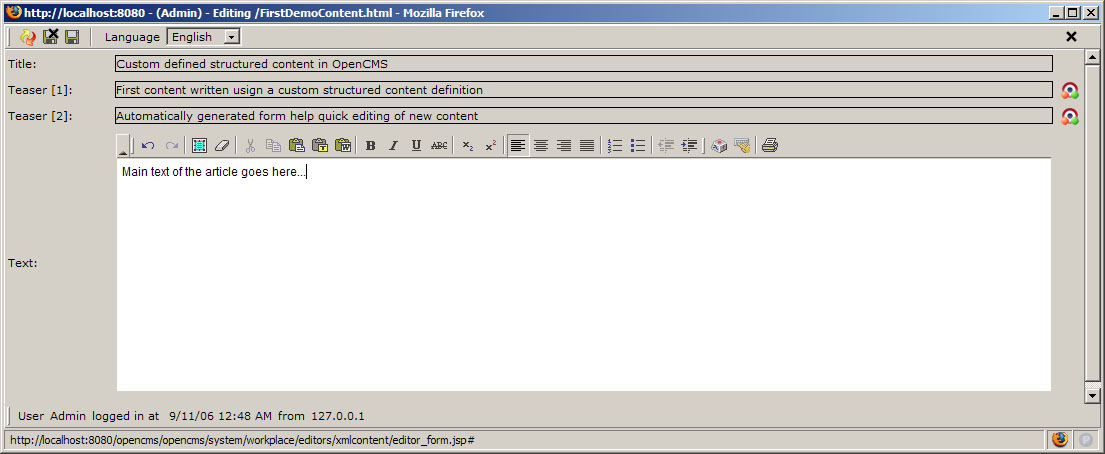
Figure 15 - Editing content based on custom definition
Displaying the structured content
If you have a directory in the VFS with several files of the same structured content type, you can display them in a JSP file using:
  <%@ page session="false" isELIgnored="false" %>
  <%@ taglib prefix="cms" uri="http://www.opencms.org/taglib/cms" %>
  <%@ taglib prefix="c" uri="http://java.sun.com/jsp/jstl/core" %>

  <cms:contentload collector="allInFolder" param="/some/dir/content/|DemoType" editable="false">

   <cms:contentshow element="Title" />
   <cms:contentshow element="Text" />

  </cms:contentload>
It is also possible to link to individual file, however this is not well documented. You need to use the <cms:contentaccess> tag introduced in OpenCMS 7.0.2 which creates a JavaBean accessible using EL:
  <cms:contentload ... >

  <cms:contentaccess var="ca" scope="page" />
  <a href="<cms:link>${ca.filename}</cms:link>">
   <cms:contentshow element="Title" />
  </a>
  </cms:contentload>
The only available documentation I have found is http://files.opencms.org/javadoc/core/org/opencms/jsp/CmsJspTagContentAccess.html
If you have nested XML Content defined in your content schema definitions, use the '/' character to denote nested attributes. For example, lets say you have an xml content definition in Image.xsd which has "File", "Title", "Alt", "Caption" attributes and lets say that content of type Image.xsd is nested within Article.xsd on an attribute named "FeatureImage", then to access the attribute "Title" on the Image inside the article, use:
  <cms:contentload ... >
     <cms:contentshow element="FeatureImage/Title"/>
  </cms:contentload>
Changing XML schema of structured content
With OpenCms 7.0, changes in the XSD are automatically applied to the XML files which use the XSD.
Here's how this works:
1. If a node has been deleted in the XSD, the corresponding XML element will be removed.
2. If a node has been reorderd in the XSD, the corresponding XML element will moved to the new position.
3. If a mandantory node has been added in the XSD, a new corresponding XML element will be created automatically.
This covers most common XSD change scenarios. Please note that changing of node types is not possible, so you can't change a text node to an HTML node with the same name.
The changes to the VFS files will be applied automatically during XML unmarshalling. So all files stay unchanged in the VFS as with the old XSD. But when they are read, the conversion happens automatically. This means you can yust use them normally, and the XML will use the new XSD. Once a file is opened in the editor and saved, the file will be converted to the new XSD. (this explanation was given by Alexander Kandzior on the OpenCms Mailing list on 10 August 2007. This is the message.) --KaiSchliemann 12:07, 10 August 2007 (CEST)
External Links
Broken link.